VIC-II for Beginners Part 5 - Bringing Sprites in good Shape
- VIC-II for Beginners Part 1 - When Visibility Matters
- VIC-II for Beginners Part 2 - To have or not to have Character
- VIC-II for Beginners Part 3 - Beyond the Screen, Rasters and Cycles
- VIC-II for Beginners Part 4 - Screen Modes Cheaper by the Dozen
- VIC-II for Beginners Part 5 - Bringing Sprites in good Shape
Games Unlimited
Hardware Sprites in addition to the Soft Scrolling capabilities were major reasons why the Commodore C64 was the ultimate gaming machine in the 80s. Sprite-based games were very popular in Arcades and converting them to the C64 often turned out not to be too difficult plus the outcome was sometimes exceptional good by home computer standards. It's no big secret that the availability of masses of games whether they were exclusive or conversions won the market for the C64 against the competition by Sinclair, Amstrad and Atari.
Thanks to the VIC-II we can officially move 8 sprites independently over the screen at any time - but when combined with Interrupt programming and a method called Sprite-Multiplexing much more action is actually possible. Many commercial games in fact move 16 or 24 sprites over the screen. Armalyte even manages to display up to 30 Sprites at the same time which is an exceptional achievement within a game. But how do Sprites work, how are they stored and retrieved in memory, how can we flip through frames to animate our Sprites?
That will be the topics for the final part of the VIC-II beginners series. Note that I enumerate the eight Sprites from from 0 to 7 which corresponds nicely with a few sprite-mapped registers where a Bit#0 corresponds to some configuration for Sprite#0, Bit#1 for Sprite#1 etc - so when I refer for example to the 5th Sprite we talk about Sprite#4.
Standard and Multicolor Sprites
A Standard Sprite on the C64 is a 2D-Object drawn in a 24x21 grid. 24x21 results in 504 Bits or 63 Bytes of required memory per Sprite Shape. The term Sprite Shape refers in a strict sense to one single frame of a Sprite which can consists of many individual frames to generate the illusion of motion when played back consecutively. In a day by day discussion the expressions Sprite and Sprite Shape are usually exchangeable though. Finally, for calculations convenience a trailing Zero Byte is added to each Sprite Shape which increases the total required memory to 64 Bytes per shape.
Our C64 Sprites come in two flavors - Standard and Multicolor. The Standard Sprite has a 24x21 matrix with one shared Background Color and one individual Foreground Color. Then there is once again a Multicolor option for Sprites which follows by the same principles as seen in Multicolor Character Mode or Multicolor Bitmap Mode. The horizontal resolution is cut in half which brings us down to a 12x21 grid. As with the other Multicolor Modes two Bits are paired at a time to enable us encoding up to four different values into each of the wide pixels. Those values again represent different sources of color information. Let's enlarge upon those two modes.
In Standard Mode you can choose one Foreground Color per Sprite and a shared Background Color applicable to all Sprites. The individual Foreground Color per Sprite is stored in the 8 Registers located from $D027 to $D02E - as expected by storing a value from $00 to $0F. The Background Color corresponds to the content of $D021. For all Registers which store color information apply that only Bit#0 to Bit#3 are taken into account while the higher Bits are ignored. For example, setting $D021 to $01 (%00000001) or to $81 (%10000001) will both set Background Color to White as $01 is the color code for White and the upper four Bits are ignored.
Multicolor Mode can be turned on for each of the 8 Sprites individually so mixing Standard and Multicolor Sprites is possible. When Multicolor is activated the Sprite has as expected four different color sources encoded in the paired horizontal pixels, namely the individual color per Sprite retrieved from $D027 to $D02E, the shared Background Color from $D021 and two additional shared colors stored in $D025 and $D026. Each Bit in the sprite-mapped register $D01C determine wether a Sprite is configured for Standard or Multicolor Mode.
Below we have a Standard Color Sprite in the 24*21 grid from the game Thrust and next to it a Multicolor Sprite with the 12*21 Matrix from the game Wizball. When you look at the Game Screenshots you will hardly notice that one of the Sprites has only half of the horizontal resolution. It's not only that actual dimensions in Wizball have not really changed as pixels were just paired but also the additional colors make the Multicolor Sprite just look much better. That's why Multicolor Sprites are usually what you will encounter in the C64 world of games - unless it's a 1:1 conversion of a Sinclair Spectrum game.
Simple 24x21 sprite in Standard Mode ripped from the game Thrust.
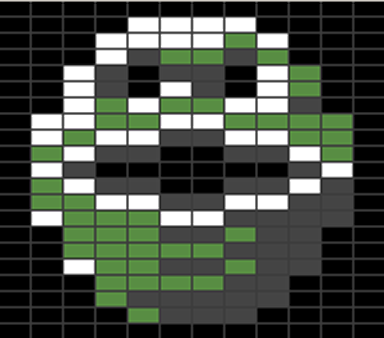
The popular Sprite Mode is the Multicolor Sprite - here used in the game Wizball.

Thrust sprite in the game
The animated sprite in the game
Collision Detection on the Interrupt
Of course Sprites would be kinda pointless if you can not make them hit anything in a game. Whether it is a collision with background graphics, say a tree or with other sprites in a game - you want to be able to get notified by the C64 when something happens. In Episode 2-3 of our introduction into C64 intros I explained how we ask the VIC-II to let us know when something of interest occurs, e.g. when the Raster Beam reached a certain line on the screen. Other topics of interest the VIC-II can be asked for are in fact collisions between two Sprites or the collision between a Sprite and Background graphics.
Interrupts revisited
There are two important registers, $D019 and $D01A. The Interrupt Request Register $D019 monitors four different sources of interrupts all the time. Bit#0 - Bit#3 do nothing but set Bits low and high depending on whats is going on in the system in respect to any of four different interrupt sources. The sources for Interrupts by the VIC-II are either Raster Interrupts, Lightpen interation and two Interrupts for Sprite Collisions. So two of those Bits monitor the Sprite activities, namely Bit#2 for Sprite-Sprite-Collisions and Bit#1 for Sprite-Background Collisions. Whenever Bit#2 is set high then two Sprites must have collided and if Bit#1 is set high a Sprite has collided with Background - and by Background the VIC-II is referring to anything non-Sprite on the screen plus which is not using the color stored in $D021.
Now that we know there is a place where activities are monitored all the time we want to ask the VIC-II to let us know when a certain event has happened. For this we need D01A, the Interrupt Mask Register, sometimes also called Interrupt Enable Register. Bit#0 - Bit#3 are identical to the corresponding Bits in $D019 but their job in $D01A is to command $D019 to let us know when any of the events we set to high in the Mask Register occur. Using $D01A we basically ask $D019 to trigger an interruption so we can react to the event.
After we have configured our desired event in $D01A we just need to wait until $D019 sets Bit#7 high. This is the signal that an event we asked an interruption for has indeed happened. If we configured more than one event in $D01A we additionally need to check which of the four Bits #0-#3 have been set high in addition to Bit#7 in $D019.
Finally once an Interrupt Bit has been set, it's "latched" in and must be cleared by writing a 1 to that Bit in the Interrupt Request Register as soon as you're ready to handle it. This allows selective interrupt handling.
Let's apply that knowhow by looking at two use cases.
1. Sprite-Sprite Collision
In the Interrupt Mask Register $D01A we need to set Bit#2 high to ask for an interruption in case of a Sprite-Sprite collision. As soon as two Sprites collide $D019 will set Bit#2 and Bit#7 high accordingly. Bit#2 will be set high because it does this anyways - remember $D019 monitors activities all the time and Bit#7 is set because we specifically asked to be notified about that event. But there is more information we get. Once the interruption happens the Register $D01E will come into play. Each Bit in $D01E corresponds to one of the 8 Sprites. The Sprite Bits which are involved in the collision will be set high. We now have everything in place to react to a collision: a notification when collision happens and the actual Sprites involved. Now when the interrupt is triggered we could for example playback an explosion animation for the involved Sprites or increase the Scores or what not. By the way after the interrupt was triggered. we need to clear Bit#7 again in $D019 by acknowledging the IRQ. It will not reset automatically.
2. Sprite-Background Collision
When you have understood Sprite-Sprite-Collision, then this is now very easy. Again we ask for interruption for the event of collision, this time by setting Bit#1 in $D01A as we now are interested in Sprite-Background Collisions. Again $D019 will set Bit#7 high in addition to Bit#1 when the collision takes place after we registered it in $D01A. This time $D01F which is again mapping each of its Bits to one of our 8 Sprites will let us know which Sprite was involved in the collision.
There is one more thing...
To keep you interested I waited to share the following. The above way of detecting collisions is not really a viable one but just coding "by the book". Some games rather implement their own detection routines for sprite/sprite collisions using bounding boxes which is much more efficient and above all make more sense for most use cases. Also Sprite/Background collisions are rather detected by scanning the character memory map and keep track how they relate to a Sprite position.
Anyways, it does not hurt when you understand how things work the official way!
Output to the Screen - Ready, Set, Go!
To display a Sprite on the Screen we need to enable it. The 8 Bits in $D015 turn on and off any of our Sprites. To move Sprites we need to position them and for this we have 17 Registers from $D000 to $D010. 8 Registers store the X-Coordinate (horizontal position) of any of the 8 Sprites, another 8 Registers the Y-Coordinates (vertical position) accordingly. Since we know already that our Canvas for Sprites is 512x256 large it is clear why we additional need a 9th Bit for each of the 8 X-Coordinates. The Register $D010 is that sprite-mapped Register helping out with that extra Bits we need to pass Position 255 horizontally. Don't confuse this Register with $D011 by the way - its Bit#0 functions as 9th Bit as well but for the Raster Line counter in collaboration with $D012.
Sprites can be moved freely across the screen. In fact they are not limited to the 320x200 area but their scope of activity spreads over a 512x256 grid - this makes it possible to position Sprites off-screen and let them move into the visible area. This really needs to be remembered as it is crucial when working with the the positioning - Sprites can cover a much larger canvas than the visible area of the C64 screen.
When positioning a Sprite using X/Y coordinates, the upper left Pixel of the Shape is the determining one. In other words, when you put a Sprite at Position X=50 and Y=50 then this is exactly the position on screen where the first Bit of your Sprite is drawn to followed by the other 503 Bits across the 24x21 grid to complete the Shape.
Last but not least there are two additional interesting registers $D01D and $D017. Both stretch the Sprite either horizontally or vertically by the factor 2. The number of used pixels respectively the 24x21 Matrix are not affected by this stretch and also the collision zone of the sprite is not changing from a visual standpoint. Everything not Background color will still be recognized as collision zone including all stretches.
Four Sprites Shapes: normal, horizontally stretched, vertically stretched and both sides stretched
Storing and Fetching Sprites from Memory
We already learned a lot about Sprites, that is the different Sprite Modes, how to get notified on the interrupt on collisions and how to activate and position a Sprite on screen. Now the final piece is to actually understand where those Sprite Shapes are located in memory and how we store and retrieve the sprite data.
At the very end of the Screen RAM block the last 8 Bytes are used as so-called Sprite Pointers. In standard configuration that would be the memory locations $07F8 to $07FF or Decimal 2040 to 2047. Since it's 8 Bytes and we have 8 Sprites we are obviously supposed to be able to locate a Sprite Shape by a number from 0 to 255 - anywhere in memory! You should be curious now how this is possible because we are working with 16Bit-addresses in the C64 after all, 8 Bits are not enough to address all 64Kbyte of RAM.
Remember that the VIC-II can only look at 16Kbyte of RAM at a time. A Sprite Shape has a fixed size of 64 Bytes and since a shape must be located somewhere the VIC-II can see it there are indeed only 256 different locations available per bank as 16384 (bytes size of 16Kb bank) divided by 64 (bytes size of a shape) equals 256 possibilities.
That is exactly why a single byte is all we need to point to a Sprite Shape. ll we need to take care of is that our Sprite Shape is located in a memory address in the currently active 16Kb bank that is divisable by 64. Let's assume we are in the default VIC-II Bank 3 that ranges from $0000 to $3FFF and we want to store a Sprite Shape for Sprite#0 starting at memory location $1600. For that location the Sprite Pointer in $07F8 would be $58. Too fast? Here comes the math!
$1600 or Decimal 5632 divided by 64 equals Decimal 88 or Hexadecimal $58. When we put $58 in location $07F8 the VIC-II will read 64 Bytes starting at $1600 to fetch our Sprite Shape. The content of the 64th Byte has no influence on the shape as it is defined by its 504 pixels (=63 Bytes).
Sprite Priorities - who covers what
The last thing you need to consider when working with Sprites are priorities which determine which Sprite overlays another Sprite or which Sprite overlays Background Graphics and vice-versa.
Register $D01B is again a sprite-mapped register. If a Bit is set high then the Background overlays the corresponding Sprite, if set low, the Sprite overlays the Background.
mong Sprites themselves the order of priority is already set by default and can not be changed. The higher the Sprite number, the lower is its priority. Sprite#0 has the highest priority and will overlay any other of the 7 Sprites. Sprite #3 will overlay Sprite #4 - Sprite#7 but can be covered by Sprite#0 - Sprite#2.
The C64 already defines priorities between sprites. Sprite#0 has the highest priority, Sprite#7 the lowest.
Painting and Animating Sprites
To animate Sprites you draw a handful of coherent Sprite Shapes for a flip-book style animation and store all of them next to each other in memory. It actually does not matter where you put them as long as you know which Shape you want to display next in an animation. Let's assume the first frame for Sprite#0 is at $1600, next one at $1640 and a third frame at $1680. To give the illusion of animation all you need to do is to iterate the Sprite Pointer in $07F8 over the locations of the frames - in our example you would iterate over the pointer values $58, $59 and $5A. If you do this iteration once per screen refresh you achieve a slick 60 frames per second animation. How many Frames you use per Sprite Animation is only limited by memory.
How to create Sprites Shapes and Animations
You want to paint and animate Sprites, of course - this is a very simple process: just buy a block with quad-ruled paper, draw a 24x21 grid and then for each set Bit just fill the appropriate cell on the paper. Then calculate the decimal value of each row, convert to Hexadecimal equivalent and write it into C64 memory. Repeat for all frames of your animated Sprite and all other Sprites you want to use in the game. For Multicolor based Sprites you of course also want to consider putting down the Bitmask information for each pair of Bits and have some colored pencils at hand to test different color combinations.
If this does not sound like exciting work for a few weeks I don't know what does!
Wait! I was just kidding of course - it's not 1983 anymore! There are a few Sprite Editors out there which work perfectly well with your mouse skills and offer hot-switching between Multicolor and Standard mode as well as animated timelines to see your Sprite in action. I will introduce SpritePad in one of the tutorials including how to run this Windows-Program on Mac OSX.
This closes the introduction into the VIC-II - it should have helped you to get some fundamental knowhow how graphics work in the Commodore C64. We only scratched the surface though - there is much more to learn about the VIC-II. Stay tuned.
-act